

How to Clean Stone Ear Plugs: A Complete Care Guide
Good news: of all the natural materials used for ear plugs, stone is one of the easiest to clean.
Unlike wood, natural stone does not need careful oiling. It also does not have the same water concerns. Unlike acrylic, it does not have a porous surface that can trap bacteria deep inside. Natural stone is dense, non-porous, and handles water well. There is no complicated care routine. A simple routine a few minutes each week is enough. It helps keep your stone plugs clean, odor-free, and looking their best.
This guide breaks down exactly what to do — daily, weekly, and occasionally — plus what to avoid and how to handle different stone finishes. For a full rundown on why stone is considered one of the safest plug materials, see our guide on whether stone ear plugs are safe.
Why Cleaning Your Stone Ear Plugs Matters
Stone may be non-porous, but it still collects buildup from your body. Dead skin cells, natural oils, and small amounts of sweat can gather on the surface. This happens with any plug worn in stretched ears. Over time, this buildup is responsible for two things most wearers want to avoid.
Odor. The unpleasant smell sometimes called “ear cheese” mostly comes from organic buildup. This buildup collects on the jewelry and inside the piercing channel. It does not come from the stone itself. Stone does not absorb this material the way wood can. Because of this, regular cleaning works very well to remove the smell. Most people who clean their stone plugs consistently report no noticeable odor.
Surface dulling. The oils and minerals from skin contact gradually create a film on polished stone surfaces that makes them look dull or slightly cloudy. This isn’t damage — it wipes off easily — but it means that a plug you haven’t cleaned in a few weeks won’t look nearly as vivid as a freshly cleaned one.
Neither of these issues is difficult to address. They just require consistency.
What You’ll Need
Keep these four things on hand and you’re set:
Mild, fragrance-free soap. Fragrance in scented soaps can irritate the sensitive skin around stretched lobes. Some additives can also leave residue on the stone surface. After drying, this residue may create a white haze. An unscented castile soap, a gentle antibacterial hand soap, or any fragrance-free liquid soap works well.
Soft cloth. A microfiber cloth or any soft, lint-free fabric. This is your go-to for both cleaning and drying. Paper towels work in a pinch but can leave small fibers behind on textured surfaces.
Soft-bristled brush (optional). An old toothbrush with soft bristles, designated for plug cleaning. Only needed for stone plugs with natural textures, grooves, or carved details.Not necessary for smooth, polished surfaces.
Jojoba oil (occasional use). Not a cleaning product — a finishing step. A drop or two of jojoba oil, buffed onto a fully clean and dry stone surface, restores the original shine immediately. You won’t need this every time, but it’s worth having around.
How to Clean Stone Ear Plugs: Two-Level Routine
The key distinction that most cleaning guides skip: there’s a difference between a quick daily clean and a thorough weekly clean. Both matter, but they serve different purposes and take different amounts of time.
Daily Quick Clean (2 Minutes)
Do this every time you remove your plugs, or at minimum every day you wear them.
Step 1: Rinse under lukewarm water. Hold each plug under a gentle stream of lukewarm water for 10–15 seconds. This removes the surface layer of oils and loose debris before they have a chance to dry and bond to the stone. Lukewarm water is important. Very hot water can cause thermal shock. This is a risk for stones with internal fractures. Cold water is not ideal either. It is less effective at loosening sebum.
Step 2: Rub with your fingertips. With water still running, use your fingertips to gently rub the wearable area — the part that sits inside your ear — as well as the faces of the plug. No soap needed for this step. Your fingertips provide enough friction to dislodge fresh buildup without any abrasives.
Step 3: Dry thoroughly before reinserting. Pat the plug dry with a soft cloth, then leave it on a clean surface for a few minutes before putting it back in. Reinserting a damp plug traps moisture. It sits between the stone and your lobe. This creates a warm, moist environment. It is the kind of place where bacteria grow easily. If you’re in a hurry, a thorough pat-dry is better than nothing — just make sure there’s no standing water on the surface.
Total time: under two minutes per pair.
Weekly Deep Clean (10 Minutes)
Once a week, give your plugs a more thorough clean. This addresses buildup that the daily rinse doesn’t fully remove, and keeps the stone looking its best long-term.
Step 1: Rinse under lukewarm water. Start the same way as the daily clean — a rinse to loosen surface debris before introducing soap.
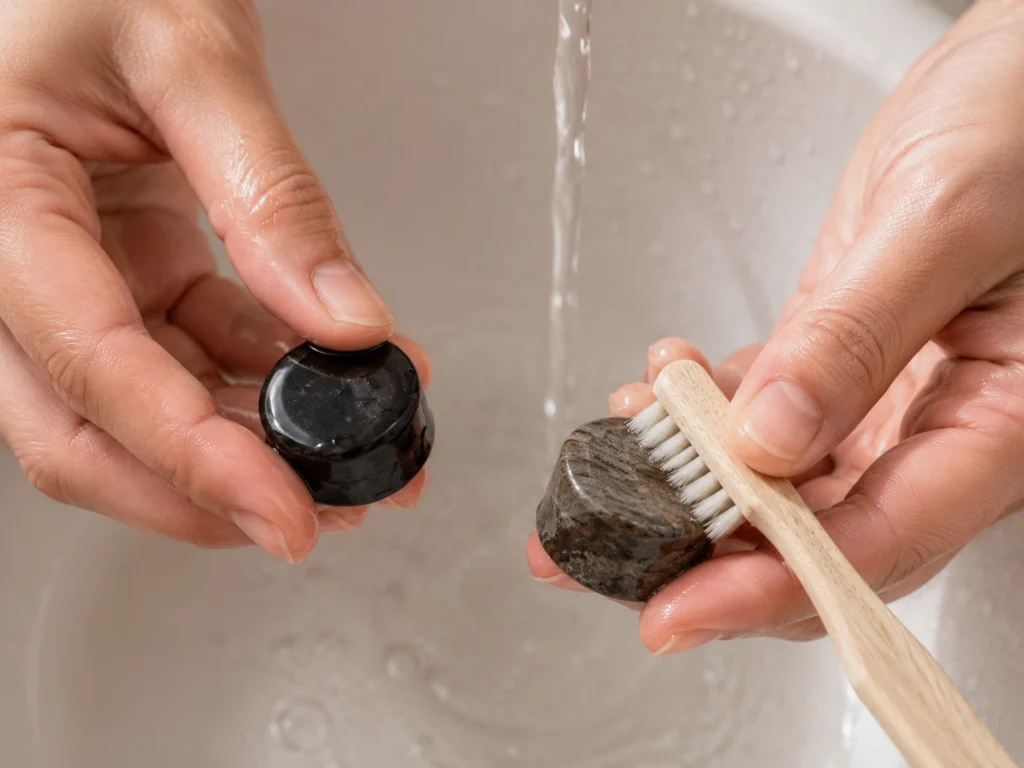
Step 2: Apply a small amount of mild soap. Add a drop of fragrance-free soap to your fingertips or directly onto the plug’s surface. Work it into a light lather, covering all surfaces — the wearable area, the faces, and around any edges or grooves.
Step 3: Clean the surface. For smooth polished stone (obsidian, labradorite, amethyst, tiger’s eye): your fingertips are sufficient. Use small circular motions. Focus on the wearable area. This is where buildup collects the most.
For textured, patterned, or rough stone, use a soft-bristled brush. This includes picture jasper, fossil materials, and carved designs. Brush gently along the natural grain or texture. Do not brush against it. This helps lift debris from grooves. It also avoids scratching the surface. Light pressure only. The goal is to dislodge material, not scrub the stone.
Step 4: Rinse thoroughly. This is the step people most often rush, and it’s worth slowing down for. Run the plugs under lukewarm water until the water runs completely clear and you can feel no soapy residue with your fingertip. Soap left on the surface dries into a whitish film that makes stone look dull — the opposite of what you’re working toward.
Step 5: Dry and air out. Pat dry with a soft cloth, then leave the plugs on a clean dry surface for at least 20–30 minutes before wearing. Good airflow helps. Don’t rush this step.
Optional finishing step: jojoba oil polish. Make sure the stone is completely dry first. Put 1–2 drops of jojoba oil on a soft cloth. Do not apply oil directly to the stone.
Gently buff the entire surface with the cloth. Use the clean side of the cloth to remove any excess oil. The transformation is immediate — a plug that looked slightly dull a moment ago will look vivid and polished again. This step doesn’t need to happen every week; once a month is plenty for most stone types.
Polished vs. Matte / Textured Stone: Does the Approach Differ?
Yes — and it’s worth knowing why before you reach for the brush.
Polished stone plugs have a sealed, glassy surface that’s extremely easy to clean. Bacteria have no tiny crevices to settle in. Soap rinses away cleanly. The results are easy to see right after cleaning. If your plug was shiny before and looks dull now, it needs cleaning. Once clean, it’ll look shiny again.
Matte, rough-face, or naturally textured stone plugs need more care. This includes dinosaur bone fossils, picture jasper with raised patterns, and carved designs. These textures create more surface area. Debris can build up more easily there. This is where a soft-bristled brush becomes important. It is not just optional.
The critical technique: always work with the natural grain or texture direction, never against it. Brushing against the grain pulls abrasive particles across the surface. These particles are already on the stone. This can create fine scratches. These scratches can change the finish permanently.
With the grain, the bristles lift debris out cleanly.
The cleaning products are identical for both types — mild soap, lukewarm water, thorough rinse. Only the technique differs.
What NOT to Use on Stone Ear Plugs
A few things worth keeping out of your routine:
Rubbing alcohol or isopropyl alcohol. It will not harm most dense natural stones directly. But it can fade color-treated or dyed stones. It can also strip natural surface oils. These oils help create shine and luster. It is also more irritating to ear tissue than mild soap.
There’s no cleaning benefit over soap and water that justifies the risk.
Bleach or harsh chemical cleaners. Too aggressive for mineral surfaces. Can etch the stone over time and cause dulling that can’t be reversed at home.
Fragranced soaps. Fragrance residue is hard to rinse away completely. This is especially true on textured surfaces. It can irritate sensitive or recently stretched ear tissue. It can also leave a film on polished stone. This film can attract more debris.
Ultrasonic cleaners. These use high-frequency vibration to loosen debris. They work well for metal and glass. But they can be risky for natural stone. Some stones have internal inclusions or natural veining. Some may also have hairline fractures. These are common and usually only cosmetic. Sustained vibration can put stress on the stone. Not worth the risk when soap and water work just as well.
Boiling water or very hot water. Rapid temperature change can cause thermal shock. This is especially true for layered stones like labradorite. It can also affect stones with micro-fractures. Lukewarm is always the right temperature for stone.
Cleaning Schedule at a Glance
| Frequency | What to Do |
| After every wear | Rinse under lukewarm water, dry thoroughly |
| Once a week | Full soap-and-water deep clean |
| Once a month | Jojoba oil polish after deep clean |
| As needed | Soft-brush clean for textured or carved stones |
The more consistently you follow the daily rinse, the less work the weekly deep clean requires. Most buildup problems come from skipping the daily step for weeks and then wondering why things smell or look dull.
How to Store Stone Ear Plugs Between Wears
Cleaning is half the equation — storage is the other half, and most guides skip it entirely.
Keep stone plugs separated from each other. Natural stone hardness varies by type.
Obsidian is around 5.5 on the Mohs scale. Quartz-based stones are harder. This includes amethyst and tiger’s eye. They are closer to 7 on the scale. When different stones rattle together in a shared container, the harder stone will scratch the softer one over time. Store individual plugs in separate cloth pouches, divided sections of a jewelry organizer, or a padded display case.
Avoid storing in the bathroom. The moisture from regular showers can affect storage. This is true over long periods. Even water-tolerant materials like stone are not ideal for it. A bedroom dresser or a closed box somewhere dry is better.
Keep out of prolonged direct sunlight. Some stones can fade with long UV exposure. This is especially true for amethyst. It can also happen with certain jaspers. Occasional sunlight isn’t a concern, but a sunny windowsill isn’t the right permanent home for your collection.
Frequently Asked Questions
Yes — the warm water and mild soap in most showers are perfectly safe for natural stone. Avoid using heavily fragranced shower gels directly on the plugs. These can leave unwanted residue. Make sure to dry the plugs fully before reinserting them. Do not put them back in while they are still wet from the shower.
Almost always caused by dead skin cell and sebum buildup on the plug surface or inside the piercing channel — not the stone itself. Increase how often you clean. Make sure you clean more regularly. Clean the piercing channel directly during your routine. For a detailed look at odor management and lobe health, see our ear stretching aftercare guide.
We’d recommend against it as a regular practice. While alcohol won’t damage most dense natural stone, it can fade color-treated stones, strip surface oils that contribute to luster, and is more irritating to ear tissue than mild soap. Soap and lukewarm water clean just as effectively without the downsides.
Clean thoroughly first — a lot of apparent dullness is just dried residue, and it cleans off. Once completely dry, buff with 1–2 drops of jojoba oil on a soft cloth and wipe away the excess. If the plug still looks dull after both steps, the surface may have been scratched by an abrasive. In that case, a professional stone polishing service can often restore the original finish.
The Last Word
Stone ear plugs reward a simple, consistent routine. Rinse them after wear, deep clean once a week, and store them where they won’t knock against each other — and they’ll look as good years from now as they do today. That kind of longevity is one of the real advantages of natural gemstones over synthetic alternatives.
Browse our full collection of natural stone ear plugs — obsidian, labradorite, tiger’s eye, amethyst, African turquoise, and rare finds like dinosaur bone fossils, all hand-polished and available from 6 mm to 32 mm.
Not sure which stone to start with? Our guide to the best stone ear plugs breaks down every option by style, weight, and what each stone is traditionally associated with.